

Euro Truck Simulator 2 How To Play Online
Play With an Online Simulator to Learn Camera Settings
Today's Best Tech Deals
Picked by TechHive's Editors
Top Deals On Great Products
Picked by Techconnect's Editors
Modern digital cameras make photography so simple that it seems like you just need to press the shutter release to take a good photo. While that might be true for snapshots, there are many situations in which a little knowledge of photography goes a long way to helping you get a better picture. Have you ever wanted to really understand how all the variables--focal length, ISO, aperture, shutter speed, and so on--contribute to your photos? A while ago, I explained how you can use a simple point-and-shoot camera like a photo laboratory to experiment with exposure settings, but this week I've got something even cooler: a Web site that simulates the operation of a digital SLR. You can use it to tweak the settings and see the results instantly.
Getting Started with CameraSim
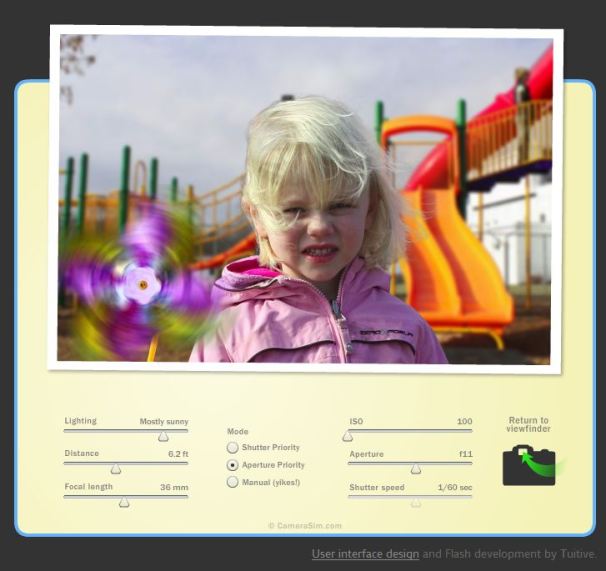
Ready to try it out? Surf over to CameraSim. You can start fiddling with the camera settings right away; there's no registration or anything else getting in the way. You'll see something like this:
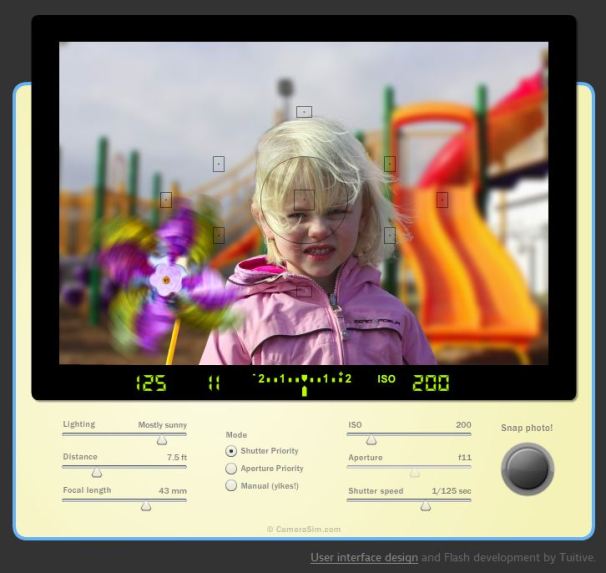
You're seeing the scene as it might appear in a camera's viewfinder--a girl at the playground, holding a pinwheel that's spinning in the breeze. When you click the shutter release, you instantly see the effect of your exposure settings. (Click Return to Viewfinder to take another picture.) That's all we need to explore how to vary exposure and other camera settings to capture your photo. Now, let's look at some ways to experiment.
Use the Zoom to Vary Perspective
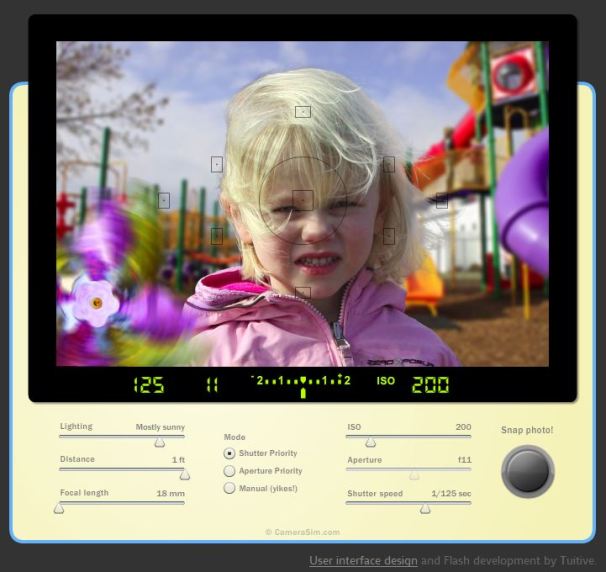
CameraSim does a good job of showing the effect of distance and focal length on your photo. Since we can see this through the viewfinder without taking a picture, there's no need to snap the shutter release to experiment with this.
Start with distance: As you move the slider, you can see how changing your distance from the camera to the subject changes the look of the scene. Notice that the girl and the playground equipment don't change size at the same rate. Instead, as you get closer to the subject, the foreground gets bigger much more quickly than the more distant background. This is called the parallax effect, and you can take advantage of it to emphasize the subject while reducing emphasis on the background.
You can see this in the image below, where we've gotten very close to the subject with a wide angle lens to really put the subject front and center.
Next, move the Focal Length slider. When you do that, you'll see the foreground and background growing larger or smaller in equal measure. This is a good rule to keep in mind: Using your camera's zoom control is not the same thing as using your feet to get closer or farther from the subject. They have noticeably different effects on the photo.
Use Shutter Speed to Capture (or Freeze) Motion
CameraSim should be set to Shutter Priority to start with, which lets you change the shutter speed while the camera automatically adjusts the aperture setting to match. That's great; leave it there for now. Over on the Shutter Speed slider, note the current setting (probably 1/125 second) and take the picture. You'll see some blur in the pinwheel, like this:
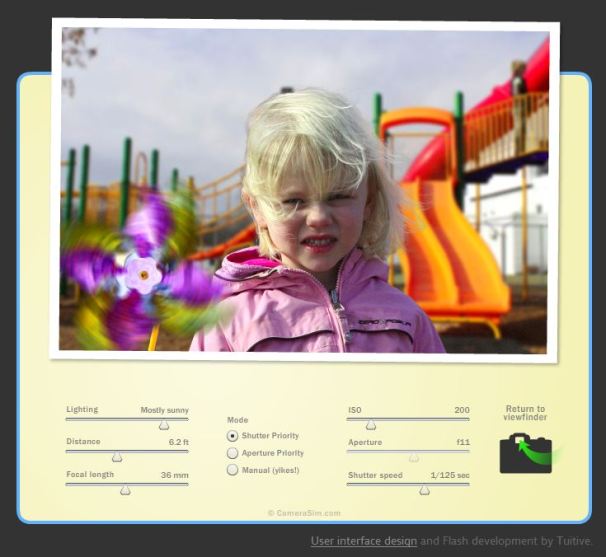
Now try again at 1/20 of a second--the pinwheel should be completely blurred. For comparison, slide the shutter speed all the way over to about 1/500 second. The pinwheel is frozen in time, as you see here:

Under- and Overexposing Photos
If you move the Shutter slider too far (slower than 1/13 second), the aperture reaches its physical limit (f/36) and can't get any smaller. As a result, shutter speed settings below this point will generate an overexposed photo.
You can also underexpose the photo, but to do that, you'll need to lower the camera's ISO. It's currently set to ISO 200. Lower it to ISO 100, and then notice that once you hit a shutter speed of f/2.8, the aperture is open as wide as it can go--since the camera can't admit more light, any shutter speed faster than about 1/1250 second generates a dark, underexposed photo.
Use Aperture to Change Depth of Field
Most photographers love to gently blur the background to draw attention to the subject in the foreground. You do that, of course, by shooting with a relatively large aperture (which corresponds to a small f/number). You can see this in action by changing the exposure mode to Aperture Priority and setting the Aperture to f/2.8. This is the lens's largest aperture, and it should generate the least depth of field--the background should be quite blurry. Indeed, you should find the photo looks pretty much like the view through the viewfinder.
Here's a bit of digital SLR trivia for you: Your camera leaves the camera lens set to its biggest aperture right up until you press the shutter release in order to let the most light into the viewfinder while you compose your photo. When you press the shutter release, it "stops down" the lens to the desired setting. If you choose the biggest aperture, you won't see a difference in the depth of field between the viewfinder and the exposed photo.
Now try the opposite extreme. Drag the Aperture slider over to f/36, which is the smallest aperture setting, and take the shot. You should have a fairly sharp background, right?
Wait, what happened? It's all blurry!
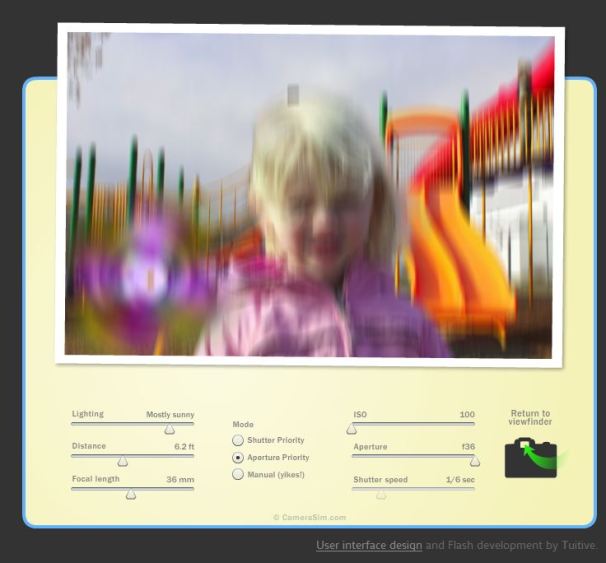
Check your shutter speed. The camera had to automatically set a slow shutter speed to compensate for the tiny aperture, and since this simulator assumes you're hand-holding the camera, it added blurriness due to camera shake. Unfortunately, there's no setting on this page to say "I've got the camera mounted on a tripod." You should back off on the aperture until the shutter speed is 1/60 second. Try again, and you'll find a sharper background.
Keep Playing
There are other things you can do with CameraSim. For example, you could increase the ISO to add more light to the scene, and then re-try the f/36 scene to get a sharper background. That'll work, but varying the ISO will also let you see the relative increase in digital noise that higher ISO settings contribute to photos.
And while you're fooling around, click over to Manual control and try setting both aperture and shutter values yourself, and see how varying the lighting from Sunny to Dim Indoors affects exposure as well. Happy virtual shooting!
Hot Pic of the Week
Get published, get famous! Each week, we select our favorite reader-submitted photo based on creativity, originality, and technique.
Here's how to enter: Send us your photograph in JPEG format, at a resolution no higher than 640 by 480 pixels. Entries at higher resolutions will be immediately disqualified. If necessary, use an image editing program to reduce the file size of your image before e-mailing it to us. Include the title of your photo along with a short description and how you photographed it. Don't forget to send your name, e-mail address, and postal address. Before entering, please read the full description of the contest rules and regulations.

This week's Hot Pic: "Praying Mantis" by Jondaar Jondaar, New Zealand
Jondaar writes: "I'm new to photography, but I recently found this praying mantis in a wool bale, and I thought this would make a great macro shot. I used a Fujifilm S9600."

This week's runner up: "White Peacock" by Kenneth Schneider, Miramar, Florida
Kenneth writes: "I took this photo of a white peacock butterfly in an empty lot near our South Florida home." Kenneth used a Canon 60D with a 300mm lens and a 1.4x extension.
To see last month's winners, visit our June Hot Pics slide show. Visit the Hot Pics Flickr gallery to browse past winners.
Have a digital photo question? E-mail me your comments, questions, and suggestions about the newsletter itself. And be sure to sign up to have Digital Focus e-mailed to you each week.
This story, "Play With an Online Simulator to Learn Camera Settings" was originally published by PCWorld .
Note: When you purchase something after clicking links in our articles, we may earn a small commission. Read our affiliate link policy for more details.
Euro Truck Simulator 2 How To Play Online
Source: https://www.techhive.com/article/231196/digital_focus.html
Posted by: arnetttheitchers.blogspot.com
0 Response to "Euro Truck Simulator 2 How To Play Online"
Post a Comment